Sunday 23 December 2018

Cellular Jewellery - Part 1

You may have gathered that I love jewellery with 3D elements and my mind is swimming with various ideas at times - particularly when I see 3D effects and wonder if something similar can be done in polymer clay.

Holes showing layers below has been in my thoughts for a couple of years and I had toyed with the idea and made what I thought were some nice pendants.  The first I did to cover a black cabochon and I still love the purple, green and beige tones.


Another was the Lava Pendant.  I wanted to create the feel of  bubbling lava - volcano style!  As with the previous pendant, the red, orange, and black colours were achieved using alcohol inks on a light coloured clay, while the yellow background is bright yellow clay painted with a very vibrant alcohol ink - Pinata Sunbright Yellow to be precise.  I must get some more of this ink.  It is more intense than the Ranger Adirondack Sunlight Yellow equivalent.  The downside of the Pinata is that it scorches more easily - especially if a piece requires several bakings or needs to be baked for a long time.


The next one, I called Leviathan Spit.  Leviathan was a great Sea Monster mentioned in the Old Testament of the Bible.  I always have this image of the monster rising through the surface from the deep, with water and foam running from its mouth - hence Leviathan Spit.   The base is light blue and the lighter colours are white and ivory clay.  Looks simple enough, but the white and ivory clay was rolled as thin as I could get it and then holes punched in to it and other small details added.


A colour combination I have loved for a long time is light blue and light pink.  The next pendant was pretty straight forward compared to the others.  Just a simple cellular pendant, but I liked it - and so did someone else, thankfully.


Polymer clay is extremely versatile, but it has limitations too - especially when used in making jewellery.  I'll look at some of these problems in part two of my Cellular Jewellery when a photo led to me experimenting with more layers and more three dimensional creations.

_______________________________________________________

Some of the pieces above are still available in my Etsy shop ...

https://www.etsy.com/uk/shop/AlanCordiner

Tuesday 27 November 2018

Nebula and galaxy Jewellery - Part 2

My nebula pendants began as simple black domes as described in my last article.  I felt that they represented nebulae the best I could imagine at the time - and I still think some of these simpler pendants do best represent the photos I have seen, sent back from Hubble and other space telescopes.

One pendant I created was based on a panoramic view of the infra red sky showing all the galaxies outside of the Milky Way.  This really wasn't one for carefully placing a few micro beads as the image was full of stars and galaxies and nebulae.  Again, it was a dome of black clay with a white streak of clay and Adirondack Ice Cap alcohol ink and many micro beads and was quite startling to look at.


I also did a smaller pendant around the same time called 'Black Hole' because it was my representation of what I imagined a black hole to be like - except I suppose it should really swallow up the pendant if it was anything like realistic.


Another one which was a bit more 3d than just a dome was one I called 'Starburst' as it was how I imagined a star to come to birth - emerging from the dark, gaseous mass of a nebula - again very far from reality, I have no doubt.


A final one which was just a bit more 3D was a photo I saw called 'The Gates of Heaven'.  They were apparently huge pillars of gas.  After some research, it would seem that the photo is a fake using some clever graphics, but the idea inspired me and so I did my own take on 'The Gates of Heaven'.


I did two pendants loosely based on actual nebulae.  The first was the 'Crab Nebula'.  I knew this was going to be a tough one to do and for once I wasn't wrong.  It is a spectacular nebula, but extremely difficult to even approximate in polymer clay - despite using translucent clay and liquid clay to try and capture the ethereal quality of the centre of the nebula.


The second based on a real nebula was the 'Tarantula Nebula' pendant.  With this one, I was more interested in trying to capture the beautiful colours.


A follower from Australia challenged me to try and do something representing eternity.  Now eternity is such a mind-blowing concept that it is hard enough to get your head around, let alone to even begin to represent it in some form of art jewellery.  I decided I would do a set, but rather than being domed, it would be concave and I would try and represent stars and nebulae being sucked, whirlpool-like, into total blackness.  I did the pendant by making an open-fronted hollow cabochon and inside were two circles of clay as I wanted stars to show at different levels within the piece.  On the whole I was very happy with the pendant, if not quite as satisfied with the accompanying earrings, but then it is very rare that I am fully satisfied with anything I do.  Such is the burden of being a perfectionist when one is anything but perfect.


The final nebula piece I made which was more three dimensional I called the 'Warp Nebula'.  My vision was to attempt the cloud like nature of nebulae, but with a large star appearing to be floating in the middle of the said nebula.  The pendant was pretty tricky to make and, as it turns out, even more tricky to photograph in order to show the curving depth of the piece - and to prevent it from looking reminiscent of a cat's face - which it looked nothing like in reality.


It has been almost a year since I have made a nebula pendant or set.  No doubt I will revisit them again as the subject, this kind of jewellery and the technique fascinate me.  There is so much potential with this jewellery - not only with colours and patterns, but with the 3D possibilities and I love that aspect.

My Nebula Pieces on Etsy

https://www.alancordiner.com

Monday 26 November 2018

Nebula and Galaxy Jewellery - Part 1

"When I consider your heavens,
the work of your fingers,
the moon and the stars,
which you have set in place,
what is man that you are mindful of him,
the son of man that you care for him?
You made him a little lower than the heavenly beings
and crowned him with glory and honour."
(Psalm 8:3-5)

I'm constantly amazed by the photos being sent back to earth by the Hubble space telescope.   Of course, the colours we see in these amazing photos of galaxies and nebulae aren't how they would appear if we were up close and seeing them with our own eyes.  The camera is often detecting radiation and this data, when sent back to earth is then interpreted and the various elements are colourised to show what might be out there.  They are representations often of gases and radiations which would be invisible to the naked eye.  Nor can the photos do justice to the immense size of these nebulae and galaxies which are mindbogglingly huge! 

My inspiration to make nebula jewellery came from a life-long fascination I have had with space ever since my grandmother bought me a poster of the Solar System when I was a child and which hung on the wall at the foot of my bed for some years.  I wish I still had it, but it's sadly long gone.  Of course, even attempting to create polymer clay jewellery which could do justice to the Hubble photographs, let alone the universe itself, is to be onto a hiding to nothing.  However, my love of space and my love of making 3D polymer clay jewellery meant that I had to give it a go and there are so many colours and patterns and such a sense of eerie depth in these photos that the possibilities are endless - or at least as far as your imagination and the limitations of polymer clay will allow you to  explore.

I was finally galvanised into doing something about it after a trip to the dentist.  There, I had picked up a copy of the National Geographic magazine, which had an article in it of the latest Hubble photos.  The photo which caught my attention was small, but particularly ethereal and although I couldn't return home with the magazine, I studied the photo and got a general feel for it.  It should be noted that very few of my nebula pieces are attempts to recreate the Hubble photographs.  A general shape or colour combination is the inspiration and I just go with the gaseous flow!  In any case, attempting to recreate a nebula in an inch or two of polymer clay is futile, if not downright arrogant in thinking that I or anyone else could even come close to portraying such awesome glories.   So in my jewellery, I attempt to capture the beauty, depth and ethereal quality of these wonderful parts of our wonderful universe.  That is a hard enough task as it is and some pieces, I feel, are more successful than others, but all are a joy to create - even if I only create in a secondary sense a mere shadow and an almost laughable representation of what The Lord created out of his mind.  God has the monopoly on the creation of glorious things - and talk about thinking big!

This was the first one I did after that dentist's visit - the first visit of many!  Like many of my nebula pieces, it is set in a 1" diameter bezel and it still remains one of my favourites to date - perhaps partly because it was the very first ...


Quite a few others have followed since all based loosely on the images returned from Hubble and other telescopes.  I know they look like a piece of cake to make - and in one sense they are - but they are actually quite time consuming and difficult to get to look right.  Most of the ones I have made are based on a dome of black Sculpey Premo Accents Twinkle Twinkle clay although sometimes I just use black clay with different coloured fine glitters worked into the clay.  One or two sizes of micro bead are added to represent the larger stars and bursts of colour often seen in the photos and the wispy, gaseous elements are attempted with very thin layers and smears of different clays with more micro beads added.  However, I decided that it wasn't just a case of throwing micro beads at the clay and the more the merrier.  It's amazing how just one tiny bead in the wrong place can make the piece look wrong - at least to me and so I assume to others too.  Contrary to what I am sure must be public opinion, I don't just slap the beads on.  Rather, each colour and each micro bead is chosen for its place in the piece and placed carefully.  And the 'stars' have to be visible to varying degrees, so it has to be decided in advance which beads need to be partially buried in the black clay before the first baking as these pieces may be baked three or four times before they are finished.  


I was asked by someone if I could make a purple nebula pendant for them to give as a gift to a friend.  I came up with a couple for them to choose from, but I especially liked this one as a very thin layer of translucent clay does actually give the illusion of gas ...


Each of these small pendants takes me 2-3 hours to make, but I love making each one and it is an especially pleasant and relaxing way to work with polymer clay.

Some of the others I have made can be seen below.  I assure you that quite unintentionally, but with sleight of thumb I have managed to create things which I hadn't noticed until after completion and often pointed out by others in the patterns and colours of the pieces.  In the ones below, you may be able to spot a red fox, and Woodstock, the bird from Charles M. Schulz's comic strip, Peanuts.  While in another piece alone, I saw a goose, while someone else saw a sea monster rising through the foam from the deep and yet another saw a black poodle - all in the same piece.  Can you spot them?  You may have to turn your screen to see the goose and sea monster. None of these were intended, but such is the way of clay!


Two of my favourites were a broach (pin) which I made.  I especially loved the bezel and the colours in this one ...


And the final one for this article was one of my very favourites.  It was made slightly differently in that some of the colour is polymer clay and some is alcohol ink on translucent clay.


Some of these have been sold, but some are still available in the 'Space and Science' section of my Etsy shop ...


Wednesday 21 November 2018

Christmas Wreaths

Apart from autumnal jewellery, I love making Christmas inspired jewellery.  I suspect I will be even more adventurous next Christmas, but then again, maybe not.  Got to keep your options open, you know.

Last year, just as it was too late, I wanted to do some pendants with winter/Christmas scenes.  I began this year with a couple using various media, but with polymer clay as the main ingeredient.  The sets included micro glitter, micro beads, liquid pearls, alcohol inks and acrylic paint - all in small amounts.

The pieces were much more involved and time consuming than I had expected - with each tiny Christmas bauble being rolled in very fine glitter.  The result, though, is quite pleasing and some of the baubles look like they are made of glass.   The little scenes were painted with alcohol inks and some liquid pearls were used for the snow.  The sky in the first one though, is just polymer clay.  The berries are polymer clay only, but I love making berries as they are very therapeutic.  Well, they are for me!

The first sold within ten minutes of listing it, but the heart shaped one has yet to find a new home.

Next year, I would love to do pendants with indoor Christmas scenes or Victorian Christmas scenes, but for the time being ...


 Heart Wreath Christmas Set ...

https://www.etsy.com/uk/listing/653873333/christmas-wreath-pendant-necklace-and?ref=shop_home_feat_4&frs=1

Monday 19 November 2018

Bag End, Hobbiton


Making mainly jewellery, when thinking of something to make a male friend, it is quite a poser.  Few men wear any jewellery and if they do, then its mainly a small cross or a ring or a small earring etc.  But if they aren't really into jewellery, then what I do is largely useless.

Anyway, this year I had a friend who was going to attain one of those '0' birthdays.  We thought and thought about what we could get him and searched the shops, but to no avail.  Men, I find, are notoriously difficult to buy for unless they have a very obvious hobby or interest.  I'm sure you get where I'm coming from here.

Anyway, we knew our friend is a big Tolkien fan and so, stupidly, I decided to have a go at making a small sculpture of Bag End from Lord of the Rings. As it wasn't being sold, copyright issues weren't a problem.  I decided to make it so that it could be used as a mobile phone stand or a letter rack.

The first thing to do was make a basic shell onto which I could add the detail.  I think the final sculpture ended up being about 7" long and about 3.5" high with a slot in the back.

In the photo above, you can see the shell and beginning to add the greenery on the roof.  I didn't want to use inks or paints at all if possible.  So for the green, I used two different shades - a light green and a clearly darker green and mixed them together so that they were marbled, yet still distinct colours.  I find this light and shade makes this kind of greenery look more realistic.  Into the wall was sandwiched two brass rods to add strength.  Clay later on would fix the wall solidly to the base.

The greenery - representing grass and shrubs - was textured using the tip point of a needle tool.  I tend to do it in a circular and plucking motion as you want it to look as fluid and irregular as possible.  Just having lots of tiny holes poked into the clay doesn't cut the mustard and looks unrealistic.

Gradually, the grass, shrubs and flowers were built up.  Whether doing this or jewellery with delicate leaves and flowers, I do a small section and then bake for a short time - perhaps 10 - 15 minutes.  Then cool and add a bit more and bake again.  The shell was baked for over an hour initially and then there was perhaps a further dozen short bakings.  I bake often because it is too easy to squish the raw clay while working on another part so baking preserves what you have already done.

You can see here the parts of the house being built up - the greenery and flowers, wood and the brick surrounds of the door and windows ...


The flowers are just tiny balls of clay indented in the centre using a needle tool.  You can also see the shading in the greenery caused by the mixture of two different greens.  And so the foliage is gradually built up.

The door, steps and path came next and moss and weeds added to the cracks in the steps and path.


The windows were the bit i was least pleased with.  The time I had to complete it didn't allow me to experiment.  I would have loved to print out the windows on acetate, but in the end the best I could manage was glass cabochons painted on with gold acrylic paint.  Not ideal by any stretch of the imagination, but passable.

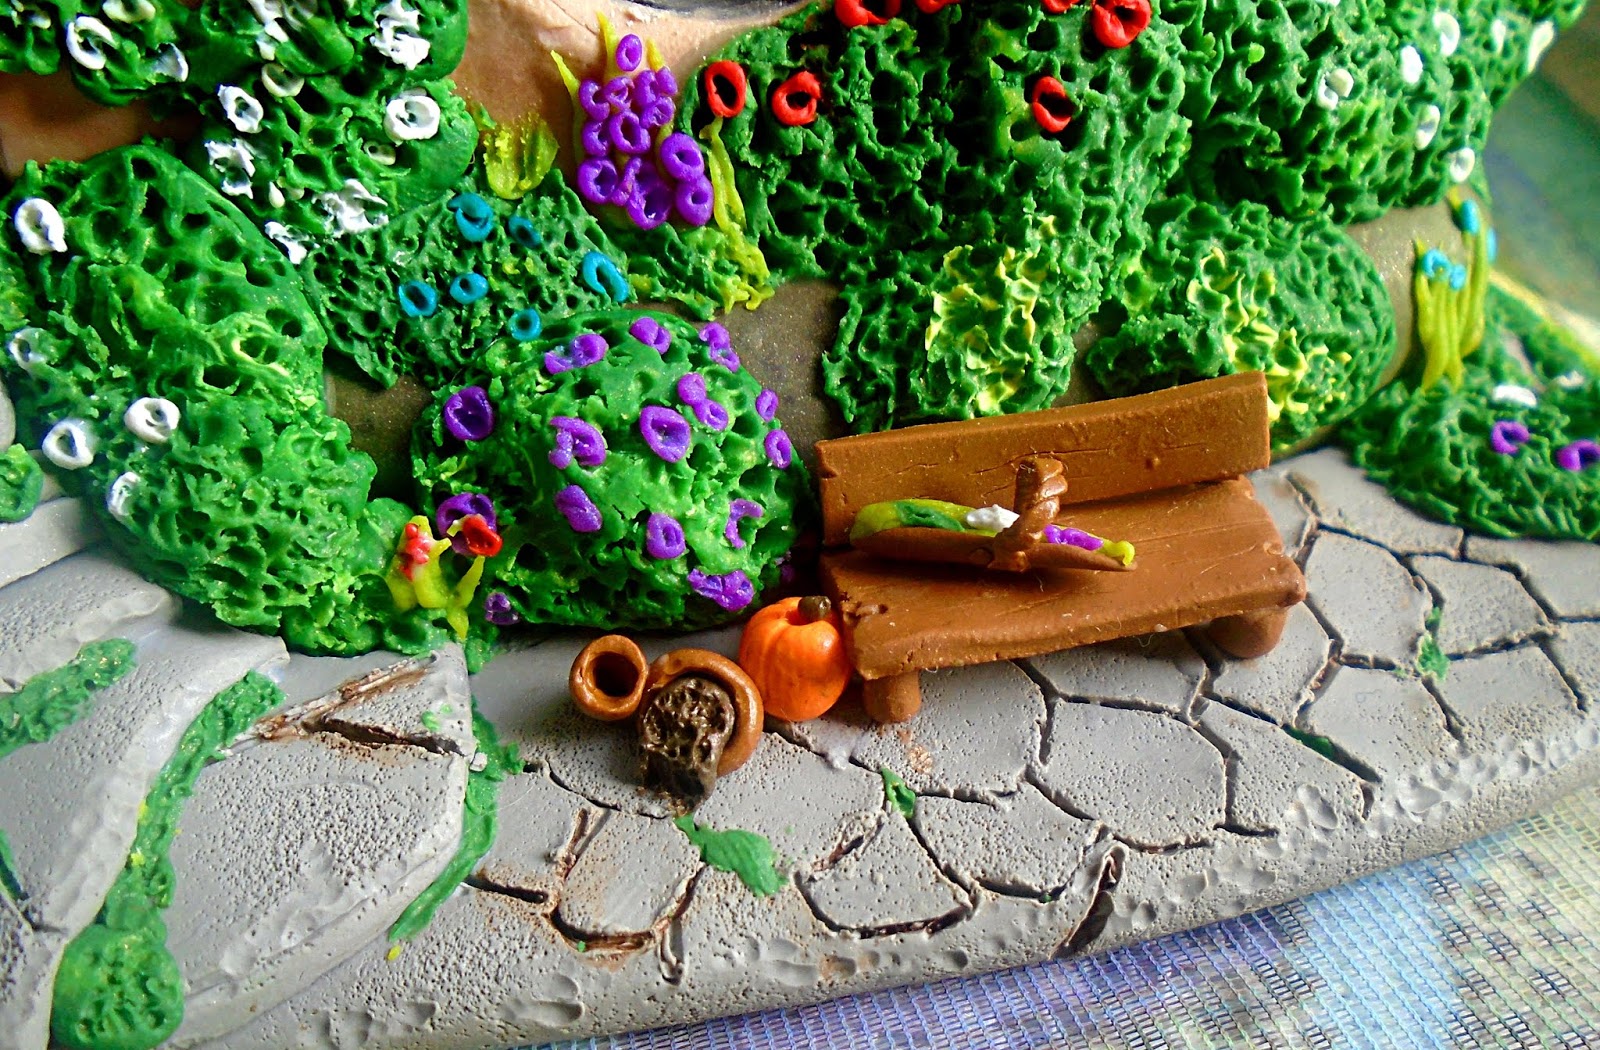
The remainder of the front of the house was small details ... a garden bench, a flower trug, flowerpots, a pumpkin, chimney pots and a light over the door.  I wanted it to look like Bilbo Baggins was around and picking flowers, but had been called away for some reason.

The final stage was to add a backing to the front of the house and then another piece at the very back to form a slot for a phone or letters.  the base and inside of the slot were then covered with bottle green felt.

It was a lot of work, especially as I am a very slow worker, but every minute was an absolute pleasure to work on and, apart from the windows, it ended up pretty much as I had envisaged it and was very happy with the result.  Photos have a habit of magnifying things, but in reality the finished house looks smaller and more delicate than in the pictures.

_________________________________________________

The bench, trug or flowers, plant pots and pumpkin ...


The finished sculpture of  Bag End, Hobbiton ...


Thursday 15 November 2018

The Christmas Table (1)

For the past two Christmases, I have wanted to make place settings, napkin rings and a tea light centrepiece for our dining table at Christmas, but for one reason or another, it hasn't happened.  This year I am determined to get it done.  I'm not exactly sure how it will turn out, but I have made a start on the tea light holder as shown in the photo.  Please do pop back to see how things are going.

https://www.alancordiner.com


Tuesday 13 November 2018

Chestnuts Roasting on an Open Fire

Autumn and Christmas are my favourite seasons.  Yes, I know Christmas isn't a season of nature like spring, summer, autumn and winter, but it is a Christian season rather than a Christian celebration as it lasts for twelve full days beginning on Christmas day.  Christmas has always meant a lot to me and even more now as a Christian.  But I love all aspects of Christmas tradition as we have received it. Before the Christian Era, we had the ancient mid-winter festivals and feasts and these were assimilated into the Christian calendar.  Jesus wasn't born on December 25th (or January 6th in the calendar of the Eastern Church).  We can't be sure exactly when he was born, but sometime in mid September seems to be most likely.  However, what we now call a traditional Christmas is quite a recent thing and Christmas as we know it is largely based on a Victorian view of an idealised 'old' Christmas, perhaps most famously portrayed in Charles Dickens's  A Christmas Carol, first published in 1843.  He and others were no doubt harking back to a Christmas of perhaps the 1700s and came to see it as a time for goodwill and a time for family and children and of giving gifts.  So all the things we consider as part of the traditional Christmas - our food and drink;  our traditions and Christmas trees and decorations; Father Christmas and presents - all stem from the early to mid 1800s.  It was a reinvention of the way we celebrate the season.  So yes, I love all of the things associated with Christmas as we celebrate it today, while still holding to the centrality of God becoming flesh in the person of Jesus Christ. Whatever anyone else celebrates at this time of year, I celebrate Christmas.

This set was inspired by that well known Christmas song which has been covered by so many, but was made most famous by Nat King Cole.  Its title is simply The Christmas Song and is filled with images of our 'traditional' Christmas - the first line perhaps being the most famous:  "Chestnuts roasting on an open fire."

This set is hand-crafted purely from polymer clay.  I don't know why, but I just love it when autumn and Christmas come round so I can indulge in making nuts and berries.  I could happily make them all year round, but who would want them?  I made some which are split open and some nearest the fire which are charred in places - because that's what chestnuts do when they are roasted.

Why roasting chestnuts in particular is associated with Christmas, I have no idea.  Yes, chestnuts are an autumnal fruit, but there are others.  However, roasting chestnuts on an open fire is such and evocative image - and practice for those who do it - especially in these days of central heating and radiators.  It conjures up images of chestnuts being roasted in snowy streets in braziers and sold for a ha'penny a bag or of the family gathered around the hearth on a cold winter's night as they share in this lovely tradition.


The set is obviously inspired by The Christmas Song, but was also inspired by a pendant I had much enjoyment in making last year, based on another of our festive food and drink traditions - that of mulled wine.  The spices used in mulled wine are again, very much associated with Christmas and I was very pleased with the outcome of the pendant, which was a joy to create.


The mulled wine pendant  has since gone to a new home, but the chestnut set is still available in my Etsy shop along with other pieces from my autumn and Christmas collections.

Chestnuts Roasting on an Open Fire
 

Featured post

Bag End, Hobbiton

Making mainly jewellery, when thinking of something to make a male friend, it is quite a poser.  Few men wear any jewellery and if they ...